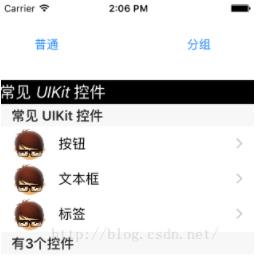
本文实例为大家分享了swift自定义表格控件的具体代码,供大家参考,具体内容如下
1、效果图

2、控件
storyboard上的控件就2个:uibutton。
3、为按钮添加点击事件
通过辅助编辑器为这2个按钮添加按钮单击事件:分别为 generalbtnclick 和 groupbtnclick
4、完整代码
import uikit
enum uicontroltype{
    case basic
    case advanced
}
class viewcontroller: uiviewcontroller , uitableviewdelegate, uitableviewdatasource{

    var tableview:uitableview?

    var ctrlnames:[string]? = ["按钮", "文本框", "标签"];

    var allnames:dictionary?

    var adheaders:[string]?

    var ctype:uicontroltype!

    override func loadview() {
        super.loadview()
    }

    override func viewdidload() {
        super.viewdidload()

        //        //初始化数据,这一次数据,我们放在属性列表文件里
        //        self.ctrlnames =  nsarray(contentsoffile: nsbundle.mainbundle().pathforresource("controls", oftype:"plist")!) as? array
        //
        //        print(self.ctrlnames, terminator: "")

        //初始化数据,这一次数据,我们放在属性列表文件里
        self.allnames =  [ 0:[string](self.ctrlnames!),1:[string]([
            "日期选择器",
            "网页选择器",
            "工具条",
            "表格视图"])
        ];

        //        print(self.allnames, terminator: "")

        self.adheaders = [
            "常见uikit控件",
            "高级uikit控件"
        ]
    }

    @ibaction func generalbtnclicked(sender: uibutton) {
        self.ctype = uicontroltype.basic


        //创建表视图
        self.tableview = uitableview(frame:cgrectmake(0, 100, self.view.frame.size.width, self.view.frame.size.height - 100), style:uitableviewstyle.plain)
        self.tableview!.delegate = self
        self.tableview!.datasource = self
        //创建一个重用的单元格
        self.tableview!.registerclass(uitableviewcell.self, forcellreuseidentifier: "swiftcell")
        self.view.addsubview(self.tableview!)


        //创建表头标签
        let headerlabel = uilabel(frame: cgrectmake(0, 0, self.view.bounds.size.width, 30))
        headerlabel.backgroundcolor = uicolor.blackcolor()
        headerlabel.textcolor = uicolor.whitecolor()
        headerlabel.numberoflines = 0
        headerlabel.linebreakmode = nslinebreakmode.bywordwrapping
        headerlabel.text = "常见 uikit 控件"
        headerlabel.font = uifont.italicsystemfontofsize(20)
        self.tableview!.tableheaderview = headerlabel
    }

    @ibaction func groupbtnclicked(sender: uibutton) {
        self.ctype = uicontroltype.advanced

        //创建表视图


        self.tableview = uitableview(frame:cgrectmake(0, 100, self.view.frame.size.width, self.view.frame.size.height - 100), style:uitableviewstyle.grouped)
        self.tableview!.delegate = self
        self.tableview!.datasource = self
        //创建一个重用的单元格
        self.tableview!.registerclass(uitableviewcell.self, forcellreuseidentifier: "swiftcell")
        self.view.addsubview(self.tableview!)

        //创建表头标签
        let headerlabel = uilabel(frame: cgrectmake(0, 0, self.view.bounds.size.width, 30))
        headerlabel.backgroundcolor = uicolor.blackcolor()
        headerlabel.textcolor = uicolor.whitecolor()
        headerlabel.numberoflines = 0
        headerlabel.linebreakmode = nslinebreakmode.bywordwrapping
        headerlabel.text = "高级 uikit 控件"
        headerlabel.font = uifont.italicsystemfontofsize(20)
        self.tableview!.tableheaderview = headerlabel
    }


    //在本例中,只有一个分区
    func numberofsectionsintableview(tableview: uitableview) -> int {
        return self.ctype == uicontroltype.basic ? 1:2;
    }

    //返回表格行数(也就是返回控件数)
    func tableview(tableview: uitableview, numberofrowsinsection section: int) -> int {
        let data = self.allnames?[section]
        return data!.count
    }


    // uitableviewdatasource协议中的方法,该方法的返回值决定指定分区的头部
    func tableview(tableview:uitableview, titleforheaderinsection
        section:int)->string?
    {
        var headers =  self.adheaders!;
        return headers[section];
    }
    // uitableviewdatasource协议中的方法,该方法的返回值决定指定分区的尾部
    func tableview(tableview:uitableview, titleforfooterinsection
        section:int)->string?
    {
        let data = self.allnames?[section]
        return "有\(data!.count)个控件"
    }


    //创建各单元显示内容(创建参数indexpath指定的单元)
    func tableview(tableview: uitableview, cellforrowatindexpath indexpath: nsindexpath) -> uitableviewcell
    {
        let identify:string = "swiftcell";

        /// 同一形式的单元格重复使用。
        let secno = indexpath.section;
        var data = self.allnames?[secno];
        if (0 == secno)
        {
            let cell = tableview.dequeuereusablecellwithidentifier(identify, forindexpath: indexpath);
            cell.accessorytype = uitableviewcellaccessorytype.disclosureindicator;

            cell.imageview?.image = uiimage(named: "1");
            cell.textlabel?.text = data![indexpath.row];

            return cell;
        }

        else
        {
            let adcell = uitableviewcell(style: .subtitle, reuseidentifier: "swiftcell");
            adcell.textlabel?.text = data![indexpath.row];
            adcell.detailtextlabel?.text = "这是\(data![indexpath.row])的说明";

            return adcell;
        }
    }

    // uitableviewdelegate 方法,处理列表项的选中事件
    func tableview(tableview: uitableview, didselectrowatindexpath indexpath: nsindexpath)
    {
        self.tableview!.deselectrowatindexpath(indexpath, animated: true)

        let itemstring = self.ctrlnames![indexpath.row]

        let  alert = uialertcontroller(title: "提示", message: "你选择了:\(itemstring)", preferredstyle: uialertcontrollerstyle.alert);
        let sureaction = uialertaction(title: "确定", style: uialertactionstyle.default, handler: {(action)->void in});
        alert.addaction(sureaction);

        presentviewcontroller(alert,animated:true, completion:nil);

    }

    override func didreceivememorywarning() {
        super.didreceivememorywarning()

        // dispose of any resources that can be recreated.
    }
}
以上就是本文的全部内容,希望对大家的学习有所帮助,也希望大家多多支持。

